Developing and registering custom models
What you will learn:
- How to load a custom trained model into Snorkel Flow
In addition to built-in model templates, we can also train a custom model and use it as part of an application. To do so, we create a custom model class in a Notebook via the Python SDK.
In this example, you will work with a contract dataset and determine whether each contract can be classified as a loan, employment, service, or stock contract based on the text feature.
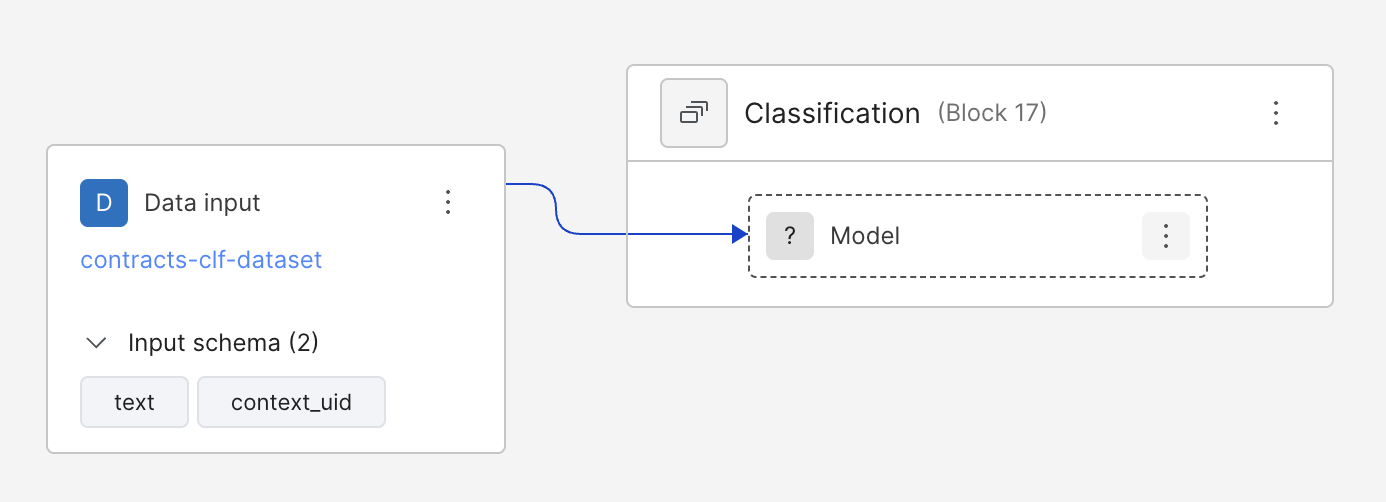
You can access the Pipeline (DAG) in the left-hand menu. To go back to Develop (Studio) view, click on the Model in the DAG.
Develop a custom model
Workflows for developing custom models will typically include
- Retrieving the data from the application
- Training the model in Notebook
- Defining a model class
- Registering the class via SDK.
Retrieving data
In Notebook, retrieve the programmatically labeled training data that precedes the model node using the SDK method get_node_data. Specify split="train" to receive data from the train split and training_set_labels=True to receive the labels. Then, pop the labels to target y_train.
Note: training_set_labels requires a training set uid. If you don't have one, it can be created by calling sf.add_training_set(node_uid).
import snorkelflow.client as sf
df_train = sf.get_node_data(
    node=node_uid, # model node uid
    split="train",
    ground_truth=True,
    training_set_labels=True,
    training_set_filter_unlabeled=True, # filter out unlabeled data points
)
y_train = df_train.pop("training_set_labels")
To clean up the data, remove any columns like id column context_uid that are not needed for training. In this example, keep only the 'text' column. Make sure to remove the ground truth label columns if it's in the dataframe.
relevant_columns = list(df_train.columns.values)
relevant_columns.remove('context_uid')
relevant_columns.remove('url') # in the dataframe and not needed for training
relevant_columns.remove('ground_truth')

df_train = df_train[relevant_columns]
Training a model
Now that you’ve prepared your data from the model node, you’re ready to train a model. A model of any choice is acceptable: e.g. Sklearn, PyTorch, Keras, etc. Feel free to experiment with a variety of custom models.
The chosen model must be able to extract the weights and save them to disk.
To illustrate a simple example, lets train a Logistic Regression model from Sklearn.
You will first extract the values from the pandas dataframe, fit a LogisticRegression() model, and make the predictions on the training data. Since the text column contains string data, use TfidfVectorizer to perform text vectorization.
from sklearn.linear_model import LinearRegression
from sklearn.feature_extraction.text import TfidfVectorizer

vectorizer = TfidfVectorizer(max_features=5000)
X_train = df_train["text"].str.lower()
X_train = vectorizer.fit_transform(X_train).toarray() # vectorize the text data

model = LogisticRegression() # model
model.fit(X_train, y_train) # train against the ground truth stored in y_train
Defining a custom model class
After training the model, you need to write a custom model class in Notebook that inherits from the base class TrainedClassificationModelV2. Within the class, several necessary methods need to be defined: __init__, save, load, predict.
Let’s build up these methods individually.
__init__ takes in a model parameter where you will pass in your trained model instance from above. Instantiate a model instance variable with this parameter. In addition, create a list of relevant columns (features) needed for the predict method.
Note: relevant_columns is a required list that dictates the input schema of the model. It must include all columns used by the predict method; otherwise, inference will fail.
def __init__(self, model):
    self.model = model
    self.relevant_columns = ['text']
save determines how the weights of the model will be extracted and saved to a file on disk. It takes in a required argument dirpath, which is the directory where the model will be saved. In this case, you simply pickle the model and dump it to the path. In addition, a manifest needs to be written to disk and stores meta-information regarding the model. Instantiate a BaseManifest object, pass in the class type and relevant model_fields (the relevant columns defined in __init__). Then, simply write the manifest json to the same directory.
The only two required manifest fields are type and model_fields. However, the manifest can be additionally used to store other useful metadata for use in the other methods of the class definition.
def save(self, dirpath: Path):
    import pickle
    with open(dirpath / "model.pickle", "wb") as tf:
        pickle.dump(self.model, tf)

    # Need to also define operator input schema for manifest
    model_fields = self.relevant_columns
    from snorkelflow.models.cls_model import BaseManifest
    manifest = BaseManifest(type=self.__class__.__name__, model_fields=model_fields)
    with open(dirpath / "manifest.json", "w+") as mf:
        mf.write(manifest.json())
The class method load, on the other hand, defines how you read the weights from a directory path and load an instance of the defined class. The method takes in the directory path dirpath to read from, and a storage_options argument. In this case, simply load the file from the path and unpickle the model. Then instantiate an instance of the class ExampleClass with the trained model.
@classmethod
def load(cls, dirpath: Path, storage_options: Optional[Dict[str, Any]] = None):
    import pickle

    from snorkelflow.utils import open_file
    model_path = os.path.join(dirpath, "model.pickle")
    with open_file(model_path, "rb") as tf:
        model = pickle.load(tf)

    return cls(model=model)
The last method predict dictates how you will run inference on the data with your trained model. As such, it takes in one argument df, the dataframe you will run inference on. Here, simply filter for the columns you need for prediction and call .predict and .predict_proba on the dataframe values.
predict must return a tuple of classification predictions and probabilities. However, probabilities are optional, in which case you could return ..., None instead.
def predict(self, df: pd.DataFrame):
    import pandas as pd
    processed_df = df[self.relevant_columns]
    return self.model.predict(processed_df.values), self.model.predict_proba(processed_df.values)
The full code can be seen below
from pathlib import Path
from typing import Any, Dict, Optional

from snorkelflow.models.cls_model import (
    TrainedClassificationModelV2,
    trained_models_dict,
)

class ExampleClass(TrainedClassificationModelV2):
    def __init__(self, model):
        self.model = model
        self.relevant_columns = ['text']

    def save(self, dirpath: Path):
        import pickle
        with open(dirpath / "model.pickle", "wb") as tf:
            pickle.dump(self.model, tf)

        # Need to also define operator input schema for manifest
        model_fields = self.relevant_columns
        from snorkelflow.models.cls_model import BaseManifest
        manifest = BaseManifest(type=self.__class__.__name__, model_fields=model_fields)
        with open(dirpath / "manifest.json", "w+") as mf:
            mf.write(manifest.json())

    @classmethod
    def load(cls, dirpath: Path, storage_options: Optional[Dict[str, Any]] = None):
        import pickle

        from snorkelflow.utils import open_file
        model_path = os.path.join(dirpath, "model.pickle")
        with open_file(model_path, "rb") as tf:
            model = pickle.load(tf)

        return cls(model=model)

    def predict(self, df: pd.DataFrame):
        import pandas as pd
        from sklearn.feature_extraction.text import TfidfVectorizer

        vectorizer = TfidfVectorizer(max_features=5000)
        df = df[self.relevant_columns]

        df = df["text"].str.lower()
        df_num = vectorizer.fit_transform(df).toarray()
        return self.model.predict(df_num), self.model.predict_proba(df_num)
Testing the custom model class
Now that you’ve written a custom model class definition, you can test the class before registering with Snorkel Flow.
# Initialize the model instance
model_instance = ExampleClass(model=model)
# Test the save method
model_instance.save(resolve_data_path('minio://custom_model_test'))
# Test the load method
model_instance2 = model_instance.load(resolve_data_path('minio://custom_model_test'))
# Test the predict method, check that results are the same before saving+loading and after

model_instance2.predict(df)
model_instance.predict(df)
Registering the custom model class
Now that you’ve tested your custom model class, it’s time to register the class with Snorkel Flow. Simply create an instance of the class and pass in the trained Sklearn model. Then, call the SDK method sf.register_trained_model and pass in this instance, the ID of the model node, and the description of the model.
model_instance = ExampleClass(model=model)
job_id = sf.register_trained_model(model=model_instance,
                                   node=node_uid,
                                   description="our newly created custom model")["job_id"]
If you're getting an error about a label class mismatch, double check that the label classes defined in the application are the same as in the training data. Pay special attention to any unknown labels in the training data.
A server error may occur if the model class name is too long. Try shortening the name of the class.
Monitoring progress and completion
models.register_trained_model SDK method will output a Job ID for tracking. Using poll_job_status, you can track the status of the registration and prediction.
sf.poll_job_status(job_id)
Use a custom model
Now that registration has been completed, you can use the model in Snorkel Flow.
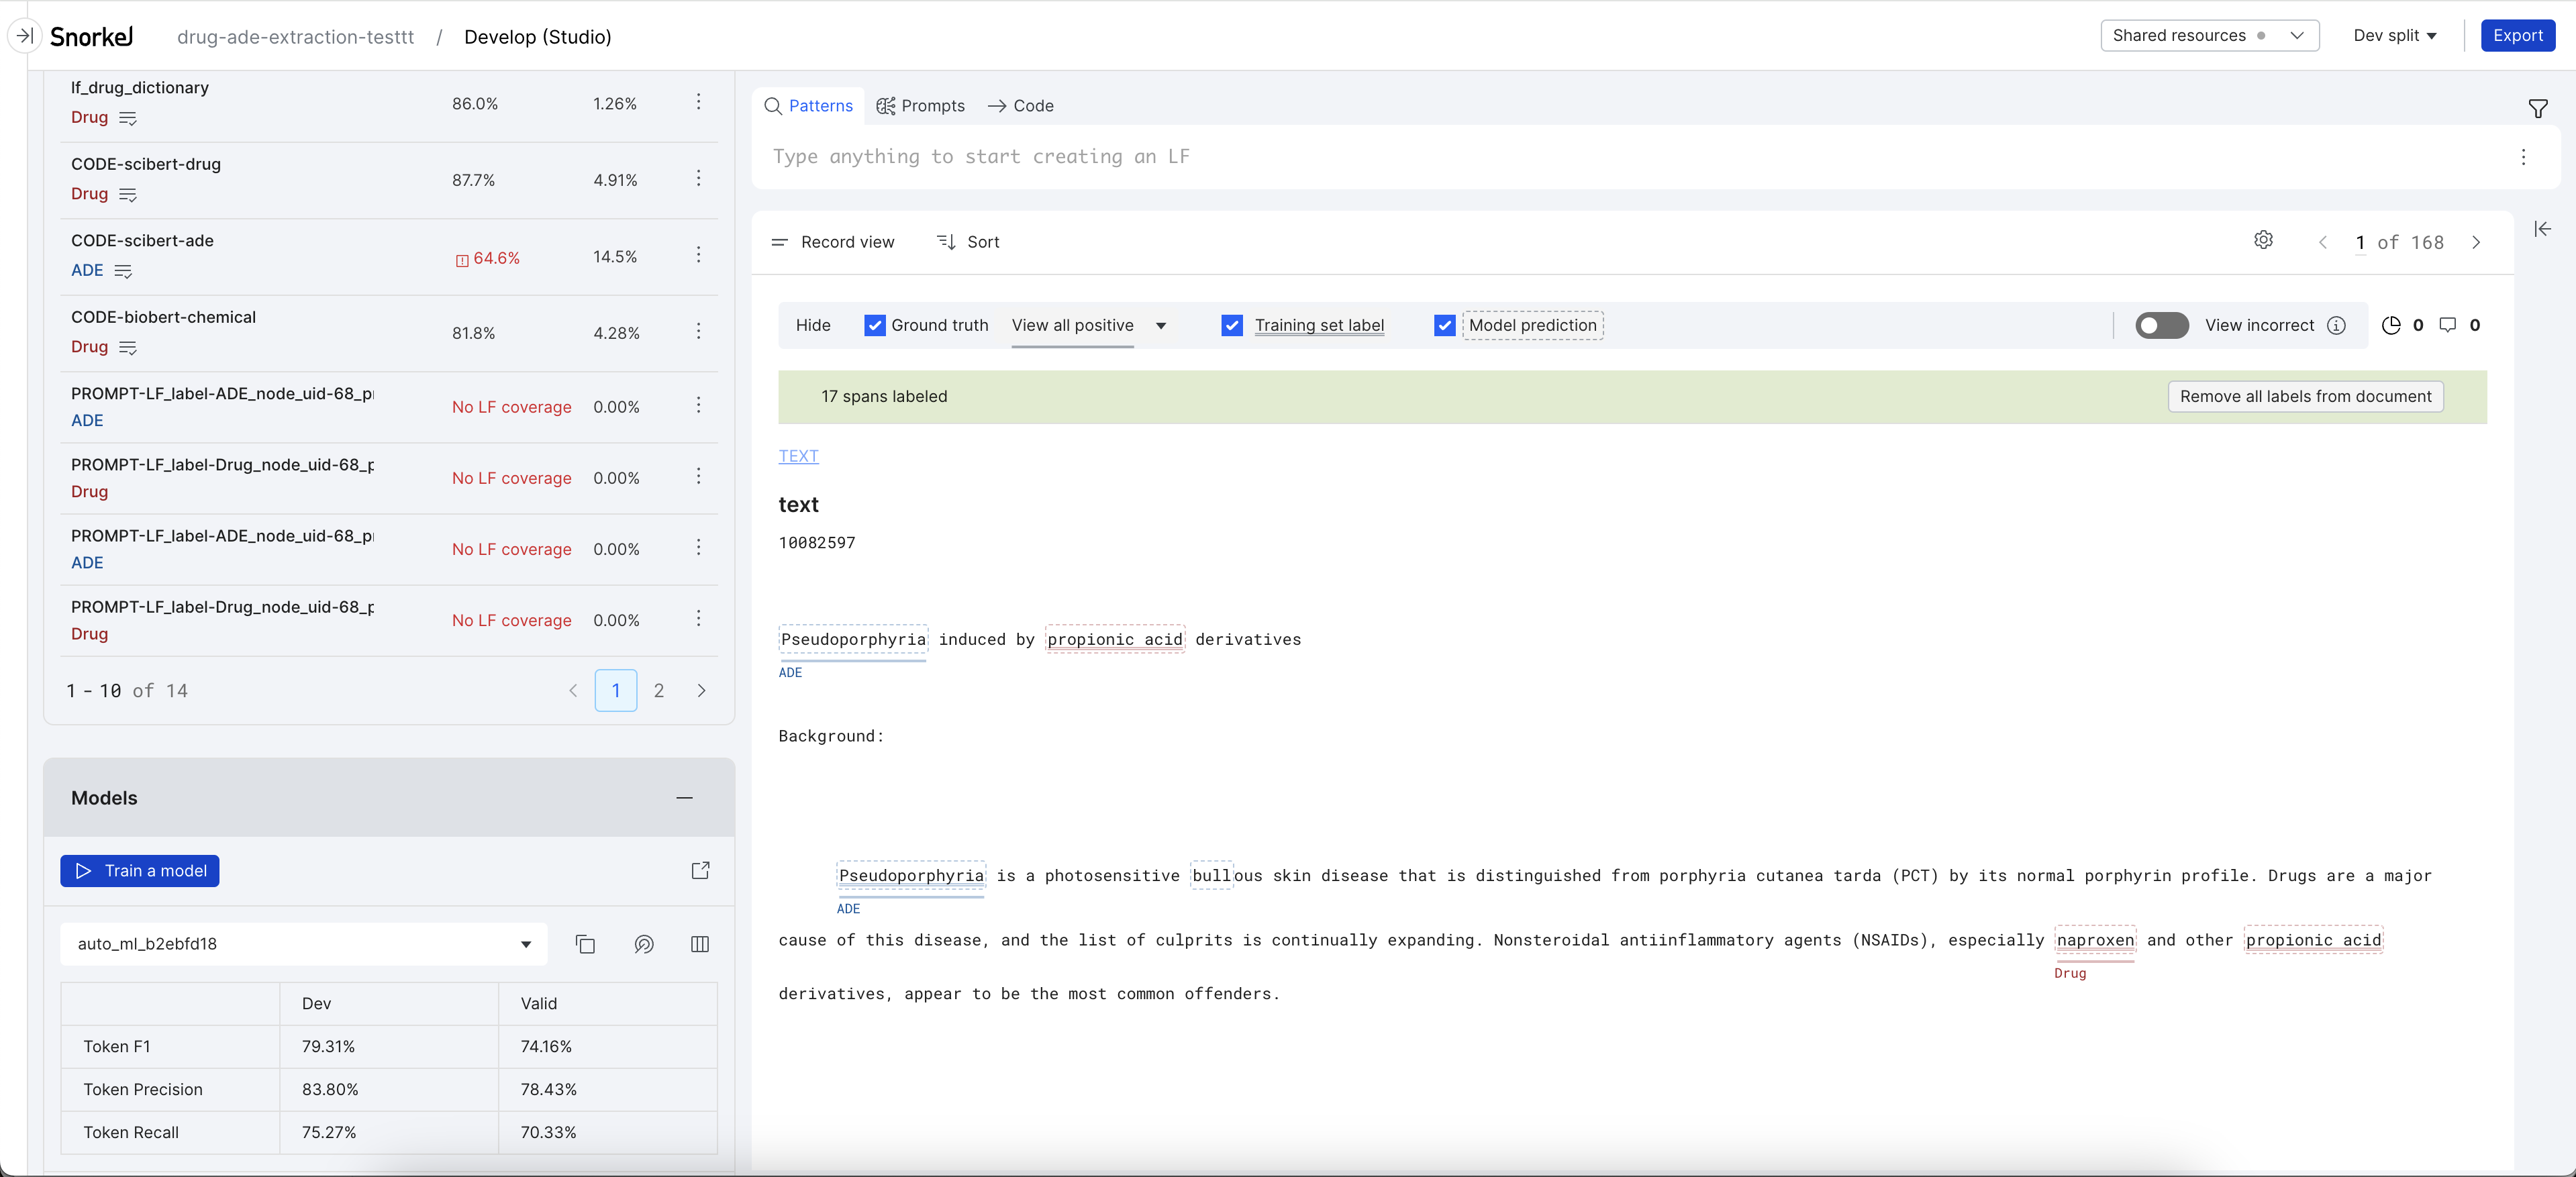
Once registration has finished, the model will appear on the Models tab in Develop (Studio). You can see more info by clicking on the External Link button next to "Train a Model." It can then be committed just like any other trained built-in model and will appear in Application Studio. The model node in the DAG will now be purple.
Note: As of now, custom models are not supported for analysis.
Investigating issues
If you encounter any issues and want to understand the details, you could enable the debug mode of the Snorkel Flow SDK. For example, if you want to investigate issues when registering the custom-trained model, you can do the following:
ctx.set_debug(True)
sf.poll_job_status(job_id)
It will show the detailed error message and stacktrace which can help you fix the custom-trained model.