How-to: Create dataset views for custom annotation user experiences
Dataset views allow you to customize the presentation of your data for annotators. This makes it easier for annotators to work on a focused set of labeling requirements for a particular annotation batch.
Two types of dataset views are available:
- Single: Use this view to display one record at a time to the annotator.
- Ranking: Use this view to display multiple records for ranking.
This guide introduces the concepts and the SDK commands for creating dataset views, and also includes two full end-to-end examples and a notebook.
- SDK: Create dataset view
- Example: Create a single response view
- Example: Create a ranking view
- Notebook: dataset-view-creation.ipynb
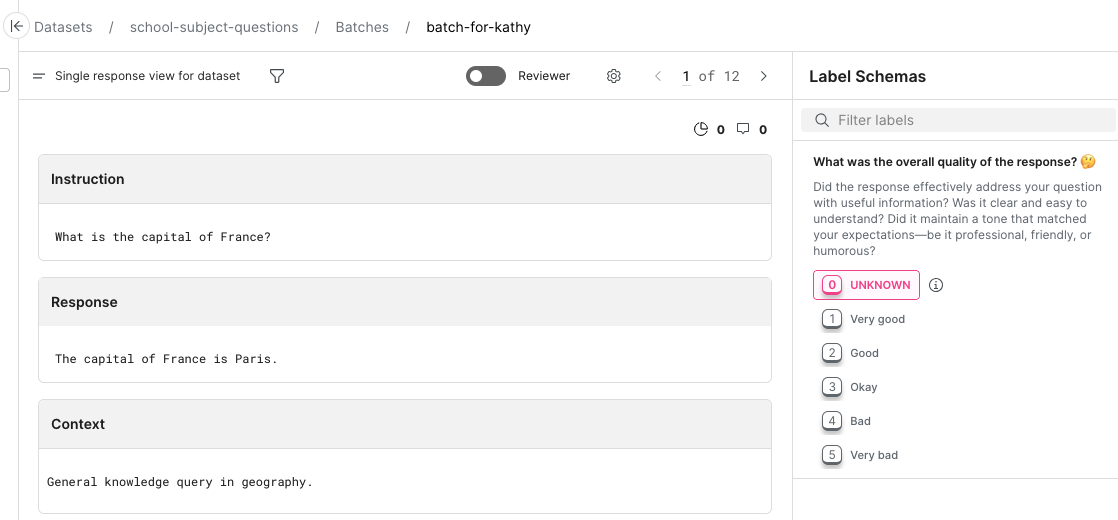
Single response view
Create a single response data viewer to show the annotator one LLM-generated response at a time. Alongside the response, display one or more label fields for the annotator to fill out. These fields can be multiple choice from a predetermined set of labels, or free text entry.
The single dataset view looks like this:

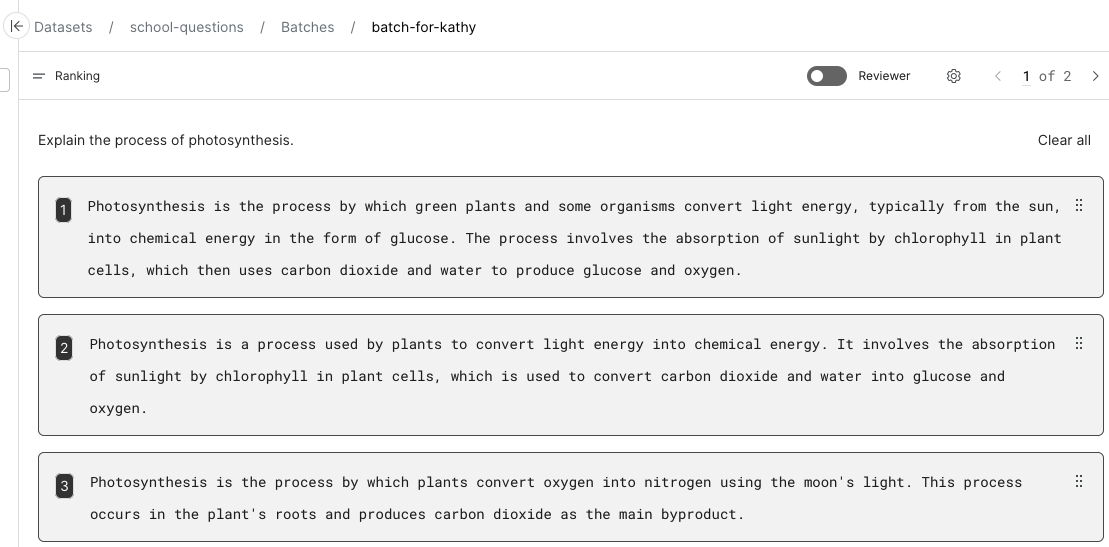
Ranking responses view
Create a ranking data viewer to show the annotator multiple LLM-generated responses to a single prompt. The annotator can drag and drop the responses to rank them from best to worst. Once the annotator orders the responses, each is labeled with the rank number.
The ranking dataset view looks like this:

Prerequisites
- A dataset for which you want to create a view
- A label schema for which you want to create a view. Note that only classification-type label schemas are supported for dataset views.
SDK: Create dataset view
Dataset views require using the Snorkel SDK.
The CONTEXT column supports a formatted view to display JSON data.
# Map the column names in your dataset to the view
column_mapping = {
  FineTuningColumnType.INSTRUCTION: "YOUR_COLUMN_NAME", # Input required, use the column name that has the LLM prompts
  FineTuningColumnType.RESPONSE: "YOUR_COLUMN_NAME", # Input required, use the column name that has the LLM responses
  FineTuningColumnType.CONTEXT: "YOUR_COLUMN_NAME", # Optional, use for notes about the record(s)
  FineTuningColumnType.PROMPT_PREFIX: "YOUR_COLUMN_NAME" # Optional, use the column name that has the system prompt(s)
}
snorkelflow.create_dataset_view(
  dataset="YOUR_DATASET_NAME", # Input required, enter the existing dataset name
  name="NEW_VIEW_NAME", # Input required, specify a unique view name for this dataset view
  view_type="VIEW_TYPE", # Input required, choose "DatasetViewTypes.SINGLE_LLM_RESPONSE_VIEW" or "DatasetViewTypes.RANKING_LLM_RESPONSES_VIEW"
  column_mapping=column_mapping,
  label_schema_uids=[] # Input required, use the label schema UID you want to use with the view
)
Download this code as a notebook.
Example: Create a single response view
Follow this end-to-end tutorial to upload a new dataset, create a label schema, and then create a single response view with an associated batch. This example uses Arcades to illustrate the major steps. Arcades are lightly interactive annotated screenshots that you can click through to see the steps in action.
Upload a dataset
- Download the school-subject-questions.csv dataset.
- In Snorkel Flow, select Upload dataset.
- Dataset name:
school-subject-questions. - Enable multi-schema annotations: Select this checkbox.
- File Upload: Select this option.
- Choose File: Choose the
school-subject-questions.csvfile. - Split: Select the
trainsplit.
- Dataset name:
- Select Verify data source(s).
- UID Column: Select
UIDfrom the dropdown. - Data type: Select Raw text.
- Text type: Select Classification.
- Primary text field: Select
Response.
- UID Column: Select
- Select Add data source(s).
Wait for the dataset to upload. You should see Data ingestion complete and the name of the dataset.
Click through the Arcade below to see these steps in action.
Create a label schema
- From the dataset page, select Label Schemas.
- Select Create new label schema.
- Label schema name: Enter a name for the label schema.
- Description: Enter a description for the label schema.
- Data type: Select Raw text.
- Task type: Select Classification.
- Primary text field: Select
Response.
- Select + Add new label. Enter as many labels as you want to use for the label schema.
- Select Add label schema.
Note that only classification-type label schemas are supported for dataset views.
Click through the Arcade below to see these steps in action.
Create a single view using the SDK
- Download the dataset-view-creation.ipynb notebook.
- In Snorkel Flow, select Notebook.
- Select Upload.
- Upload the notebook.
- Select
dataset-view-creation.ipynbto open it. - Run the notebook to create a single response view. Many cells require user input. Make note of the following:
dataset_name = "school-subject-questions"view_name = "Single Response View": You can create any name you want.view_type= "DatasetViewTypes.SINGLE_LLM_RESPONSE_VIEW"FineTuningColumnType.INSTRUCTION: "Instruction"FineTuningColumnType.RESPONSE: "Response"FineTuningColumnType.CONTEXT: "Context"FineTuningColumnType.PROMPT_PREFIX: "": This line is optional.label_schema_uids=[XXXX]: Your UID will vary.
- When you have finished running the notebook, return to Snorkel Flow.
Next, create a batch that uses the view.
Click through the Arcade below to see these steps in action. Note that the notebook may not match the Arcade exactly, and you must create the batch before you can annotate.
Create a batch for annotation
- From the dataset page, select Batches.
- Select Create new batch.
- Batch name: Enter a name for the batch.
- Label schemas: Select the label schema you created.
- Split: Select
train. - Assign to: Select an annotator.
- Select Create batch.
Click through the Arcade below to see these steps in action.
Annotate using the single dataset view
-
From the batch page, use the two-line menu in the top left of the batch, and choose the view that matches the
view_namethat you created earlier in the notebook. -
Now you can explore the dataset view from the perspective of the annotator. Make adjustments to the view as needed.
Click through the Arcade below to see these steps in action.
Example: Create a ranking view
Follow this end-to-end tutorial to upload a new dataset, create a label schema, and then create a ranking view with an associated batch. This example uses Arcades to illustrate the major steps. Arcades are lightly interactive annotated screenshots that you can click through to see the steps in action.
Upload a dataset
- Download the school-subject-questions.csv dataset.
- In Snorkel Flow, select Upload dataset.
- Dataset name:
school-subject-questions. - Enable multi-schema annotations: Select this checkbox.
- File Upload: Select this option.
- Choose File: Choose the
school-subject-questions.csvfile. - Split: Select the
trainsplit.
- Dataset name:
- Select Verify data source(s).
- UID Column: Select
UIDfrom the dropdown. - Data type: Select Raw text.
- Text type: Select Classification.
- Primary text field: Select
Response.
- UID Column: Select
- Select Add data source(s).
Wait for the dataset to upload. You should see Data ingestion complete and the name of the dataset.
Click through the Arcade below to see these steps in action.
Create a label schema
- From the dataset page, select Label Schemas.
- Select Create new label schema.
- Label schema name: Enter a name for the label schema.
- Description: Enter a description for the label schema.
- Data type: Select Raw text.
- Task type: Select Classification.
- Primary text field: Select
Response.
- Select + Add new label. Enter numeric labels from 1 to 3.
- Select Add label schema.
Note that only classification-type label schemas are supported for dataset views.
Click through the Arcade below to see these steps in action.
Create a ranking view using the SDK
- Download the dataset-view-creation.ipynb notebook.
- In Snorkel Flow, select Notebook.
- Select Upload.
- Upload the notebook.
- Select
dataset-view-creation.ipynbto open it. - Run the notebook to create a ranking response view. Many cells require user input. Make note of the following:
dataset_name = "school-subject-questions"view_name = "Ranking View": You can create any name you want.view_type= "DatasetViewTypes.RANKING_LLM_RESPONSES_VIEW"FineTuningColumnType.INSTRUCTION: "Instruction"FineTuningColumnType.RESPONSE: "Response"FineTuningColumnType.CONTEXT: "Context"FineTuningColumnType.PROMPT_PREFIX: "": This line is optional.label_schema_uids=[XXXX]: Your UID will vary.
- When you have finished running the notebook, return to Snorkel Flow.
Next, create a batch that uses the view.
Click through the Arcade below to see these steps in action. Note that the notebook may not match the Arcade exactly, and you must create the batch before you can annotate.
Create a batch for annotation
- From the dataset page, select Batches.
- Select Create new batch.
- Batch name: Enter a name for the batch.
- Label schemas: Select the label schema you created.
- Split: Select
train. - Assign to: Select an annotator.
- Select Create batch.
Click through the Arcade below to see these steps in action.
Annotate using the ranking dataset view
-
From the batch page, use the two-line menu in the top left of the batch, and choose the view that matches the
view_namethat you created earlier in the notebook. -
Now you can explore the dataset view from the perspective of the annotator. Make adjustments to the view as needed.
Click through the Arcade below to see these steps in action.
Notebook: dataset-view-creation.ipynb
View and download the dataset-view-creation.ipynb notebook: