Operators: Transform and process your data
In Snorkel Flow, operators perform transformations over DataFrames. Consider an application where you want to classify emails as SPAM or HAM (not spam). Before you begin your modeling work, you may want to clean up some of the data to make it easier to work with. For example, emails might have a lot of whitespace and odd formatting that makes them hard to reason about.
As a result, you may want to trim whitespace in the main body of each email. Suppose your email data is in a DataFrame, where the body is represented in a column called text. Once you have done this, you can write labeling functions and train a model. Finally, you can add a post processor that can filter out all SPAM emails to only leave non-spam ones. Each of these steps can be performed with an operator. Internally, operators act over Dask DataFrames as input, perform transformations, and output a Dask DataFrame.
Snorkel Flow has a series of built-in operators to perform commonly used transformations, and also allows users to write their own custom operators. Using Application Studio, you can commit operators to different nodes in the application graph to compose end-to-end applications.
Built-in operators
The following are available as built-in operators.
Featurizers
Featurizers are operators that add one or more columns, i.e., features, to a DataFrame.
Text-based
-
Truncate: truncates any field to a max token length. By passing the truncated column a name, you can keep the original column as well.
-
Whitespace: converts all non-standard whitespace characters into whitespace. By default, we use the following UTF-8 non-standard space characters with the regular space: U+00A0, U+2000 to U+200A, U+202F, U+205F, U+3000. These can be overridden using the to_replace arg.
-
Spacy: applies the spaCy model to a field and produces a new target field containing the jsonified spaCy Doc object. For large datasets of strings, this may take some time to execute.
-
RegisterCustomEmbedding: lets you register an existing embedding column, which enables access to Cluster View. The RegisterCustomEmbedding featurizer has a few key required inputs:
-
The Embedding Operator Type field specifies the type of embedding. The EmbeddingFeaturizer is used for text embeddings, and the EmbeddingCandidateFeaturizer for sequence tagging embeddings.
-
The Embedding Vector Field specifies which column contains the embedding vectors. Note that every row of data should have embeddings and that they should have the same dimension, i.e., all rows should be a list of X floats. If not, an error will be shown with remediation steps.
-
The Embedding Source Field specifies which column the embeddings were computed over. Snorkel Flow requires a source field to compute certain summaries in Cluster View.
-
The Embedding Source Candidate Field is optional, specifically for sequence tagging embeddings. This references the “context” of the sequence tagging task, while the Embedding Source Field references the spans that have been embedded.
noteThe use of this field is a beta feature for candidate embeddings in sequence tagging tasks. Please contact Snorkel if you need to utilize this feature.
The RegisterCustomEmbedding featurizer will run a set of checks on the vector column to ensure it is valid. These checks include that the vectors are all the same dimension, contain a list of floats, and are not null.
noteThe RegisterCustomEmbedding featurizer isn’t generating new embeddings. It registers existing embeddings for use within Snorkel Flow.
-
PDF-based
- PDFToRichDocParser: parses the input native PDF. A native PDF is defined as one that is not scanned. The output of this operator can then be used to extract text spans. The input PDF should not have any character/font encoding issues for the operator to function correctly.
- RichDocPagePreprocessor: filters out all RichDoc pages except ones containing spans to show on the frontend.
- RichDocSpanBaseFeaturesPreprocessor: computes the base RichDoc features for each span such as the bounding box coordinates, page number, and font size.
- RichDocSpanRowFeaturesPreprocessor: extracts row-level features such as the previous row, next row, and row header.
- PageSplitter: splits PDFs into pages for subsequent filtering and faster processing. Can be added to the RichDoc DAG by enabling “Split docs by page” on the app creation page. Window size specifies the number of pages before/after the current page to use as context for writing LFs.
- DocumentLayoutFeaturizer: computes layout features in a document using a deep learning model from the Layout Parser library. The Model dropdown can be used to select models from the library. Resolution specifies the input resolution of the image in DPI. Confidence threshold specifies the threshold used to filter the predictions. The Pages field optional input can be used to run the deep learning model on a subset of pages.
- TableRowFilter: filters out rows without tables. This requires the outputs from the DocumentLayoutFeaturizer operator described above.
OCR
- TesseractFeaturizer: takes in PDF URLs and outputs an hOCR string by running tesseract under the hood.
- AzureFormRecognizerParser: takes in PDF URLs and Azure Form Recognizer credentials to run OCR on your data.
Visual
- Lines: extract all the visual horizontal and vertical lines from a given pdf page.
Model-based
The Model and ModelBased featurizer both work by running predictions over the input data (given the specified feature fields) and storing those predictions into a prediction column. This is helpful in order to build Model-Based Labeling Functions over your data.
In addition, the ModelBased featurizer can automatically train on any Ground Truth contained in your data, allowing it to act like a typical supervised model, which can now improve your Label Model.
Model postprocessors
Model postprocessors are useful to post-process or update model predictions. Any post processors should be added to the DAG after the model node in the same block as the model node.
- SpanFilterByLengthPostProcessor: filters and removes positive spans with length <= the provided span_length.
- SpanRegexPostProcessor: labels anything that matches the provided pattern with the provided label.
- SpanRemoveWhitespacePostProcessor: removes leading & trailing whitespace in positive spans.
- SubstringExpansionPostProcessor: expands predictions to the token boundaries, should a prediction boundary fall mid-token.
- SpanMergeByRegexPatternPostProcessor: merges nearby spans with the same label, if the negative label text in between the spans matches a regex pattern.
- SpanMergeByNumberCharacterPostProcessor: merges nearby spans with the same label, if the negative label text in between the spans is in [lower, upper] number of characters (inclusive).
Time-based
TimestampFeatureExtractor: parses a timestamp column, i.e., a column of type pandas.Timestamp, and adds new columns for the following features: day of the year, day of the week, year, month, day, hour, and minute. These new features can be useful for building labeling functions or for model training.
Filters
- Label: includes or excludes rows corresponding to specified label strings.
- Label Int: includes or excludes rows corresponding to specified label ints.
- Pandas Query: includes or excludes rows based on a pandas query.
- Boolean Column: includes or excludes rows based on the value of a boolean column.
- Text Size: excludes rows with text columns that are larger than specified size (in KB).
For text extraction blocks, you can select a filter that removes all candidates according to certain criteria.
- Regex Span: removes all candidates that match a regular expression.
- Extracted Span: filters all span rows with a negative prediction.
Extractors
Text extraction blocks require at least one extractor over a field:
-
Noun Chunk: yields all noun phrases according to spaCy.
- Per spaCy’s implementation, the noun chunker iterates over all base noun phrases in a document. A base noun is a noun phrase that does not permit other NPs to be nested within it.
- Example: for the text
Hi, my name is Dr. Bubbles!, this extractor will return two spans:my nameandDr. Bubbles.
-
Regex: yields all matches for a given regular expression.
- By default the entire match is returned, though you can specify capture group = 1, for example, to extract only the span that matches what’s inside the first group of parentheses.
- Example:
r"$([0-9]+)"withcapture group = 1would extract only the45in$45
-
Date: yields all the dates in documents via a pre-defined regex.
-
The regex pattern is:
(?:[0-9]{1,2}(?:st|nd|rd|th)?\s*(?:day)?\s*(?:of)?\s*.?(?:(?:Jan(?:.|uary)?)|(?:Feb(?:.|ruary)?)|(?:Mar(?:.|ch)?)|(?:Apr(?:.|il)?)|May|(?:Jun(?:.|e)?)|(?:Jul(?:.|y)?)|(?:Aug(?:.|ust)?)|(?:Sep(?:.|tember)?)|(?:Oct(?:.|ober)?)|(?:Nov(?:.|ember)?)|(?:Dec(?:.|ember)?)),?.?\s*[12][0-9]{3})|(?:(?:(?:Jan(?:.|uary)?)|(?:Feb(?:.|ruary)?)|(?:Mar(?:.|ch)?)|(?:Apr(?:.|il)?)|May|(?:Jun(?:.|e)?)|(?:Jul(?:.|y)?)|(?:Aug(?:.|ust)?)|(?:Sep(?:.|tember)?)|(?:Oct(?:.|ober)?)|(?:Nov(?:.|ember)?)|(?:Dec(?:.|ember)?)).?\s*[0-9]{1,2}(?:st|nd|rd|th)?\s*(?:day)?\s*(?:of)?,?.?\s*[12][0-9]{3}) -
Example: for the text
Today is January 1, 2021. And tomorrow is 01/02/2021, this extractor will only return theJanuary 1, 2021span. -
See the Spacy NER section for an alternative extractor for dates
-
-
US Currency: yields all US monetary values via a pre-defined regex.
- The regex pattern is:
\\$([0-9]{1,3},([0-9]{3},)*[0-9]{3}|[0-9]+)(\\.[0-9][0-9])? - Example: for the text
5 bucks (or $5.00) is actually €4.10., this extractor will return the span$5.00. - See the Spacy NER section for an alternative extractor for currency
- The regex pattern is:
-
Spacy NER: yields all matches for a given NER tag according to spaCy.
-
spaCy’s NER models were trained on the OntoNotes 5 corpus and can predict several span labels:
PERSON: People, including fictionalNORP: Nationalities or religious or political groupsFAC: Buildings, airports, highways, bridges, etc.ORG: Companies, agencies, institutions, etc.GPE: Countries, cities, statesLOCATION: Non-GPE locations, mountain ranges, bodies of waterPRODUCT: Vehicles, weapons, foods, etc. (Not services)EVENT: Named hurricanes, battles, wars, sports events, etc.WORK_OF_ART: Titles of books, songs, etc.LAW: Named documents made into lawsLANGUAGE: Any named languageDATE: Absolute or relative dates or periodsTIME: Times smaller than a dayPERCENT: Percentage (including%)MONEY: Monetary values, including unitQUANTITY: Measurements, as of weight or distanceORDINAL:first,secondCARDINAL: Numerals that do not fall under another type
-
-
Token: yields every token, given a selected tokenization strategy.
- Tokenization options include
spacy(see implementation) andwhitespace, which captures tokens by the regex\S+
- Tokenization options include
Entity classification blocks support another pre-processor that serves as both an extractor and linker:
-
EntityDictSpanExtractor: allows you to extract all candidates according to a pre-specified dictionary of entities and link them to a canonical form. The dictionary should map each canonical form to a list of aliases:
{canonical_form: [alias1, alias2, ...], ...}. This extractor includes several options:ignore_case: Whether to ignore casing when matching entities.link_entities: Whether to link aliases with their canonical form as thespan_entity.
-
DocEntityDictSpanExtractor: extracts all candidates according to (1) a pre-specified dictionary of entities, (2) filter by a dictionary of documents to expected entities, and (3) and link them to a canonical form.
- The
entity_dict_pathshould specify a dictionary mapping each canonical form to a list of aliases:{canonical_form: [alias1, alias2, ...], ...}. - The
doc_entity_dict_pathshould specify a dictionary mapping each document uid to a list of expected span entities:{context_uid: [entity_1, entity_2, ...], ...}.
This extractor includes several options:
ignore_case: Whether to ignore casing when matching entities.link_entities: Whether to link aliases with their canonical form as thespan_entity.
- The
-
EntityDictRegexSpanExtractor: extracts all candidates according to a pre-specified dictionary of regexes and link them to a canonical form. The dictionary should map each canonical form to a list of regexes:
{canonical_form: [regex1, regex2, ...], ...}. This extractor includes several options:ignore_case: Whether to ignore casing when matching entities.link_entities: Whether to link regex with their canonical form as thespan_entity.
-
TextClustererExtractor: extracts all the horizontally and vertically clustered texts. Texts that are horizontally clustered form a span. The vertically clustered texts are extracted under region_text.
Normalizers/Linkers
In extraction-based blocks, you can also select normalizers or linkers that map the span_text to a more canonical normalized_span field.
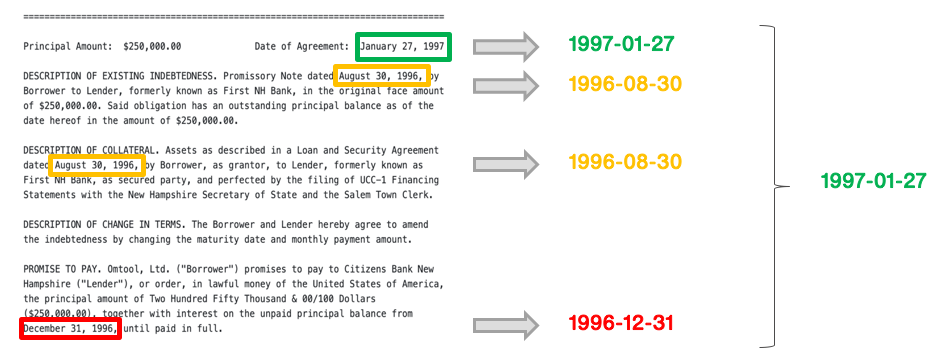
- Dates: transforms all dates found in extracted spans into the
YYYY-DD-MMformat. - US currency: transforms all US dollar values into a standard value by removing all special formatting (such as dollar signs, commas, and whitespace) and then casting the numeric value to float.
- Capitalization: transforms all string values to lowercase and only capitalize the first letter. This is helpful when working with candidates that refer to cities, names, etc.
- Numerical: transforms all numbers into words (e.g.,
42toforty two). - Ordinal: transforms all ordinal values to words (e.g.,
42ndtoforty second). - Entity Dict Linker: maps existing candidate spans to a canonical form. This is similar to the above extractor, except it skips the tagging step.
- Span-Entity: This normalizer assumes that normalized spans are already defined by the
span_entityfield.
Span-based
Extraction blocks allow the following load-processors (under Advanced Settings):
- Span Joiner: joins extracted candidates with their original contexts.
- Span Previewer: adds a field containing a localized preview of an extracted candidate. You can adjust the char window to change how many characters around the extracted span will be included in the
span_previewfield. - Context Aggregator: adds a column, context_spans, with aggregated spans for the current cot_uid. This may help express notebook LFs related to other spans in the same document.
Filters
The same filters specified in the above Featurizers section are available as postprocessors. These may be useful if you want to filter examples based on the model prediction.
By default, extraction blocks also include an ExtractedSpanFilter to remove any negative span predictions.
Reducers
Reducers heuristically aggregate, select, or convert candidate-level predictions to become document or entity-level extractions. For instance, you may know for your text extraction block, you expect one extraction per document. In this case, you may apply a reducer that selects the most-confident span per document. Similarly, in a company sentiment classification block over news articles, you may expect a single classification per (document, entity) pair. Here, you may apply a most-common reducer to find the most common sentiment for a particular company in a document.
Snorkel Flow currently supports the following reducers in document/entity-level varieties:
- Most Confident: selects the most confident span-level candidate based on confidence measured by model probabilities.
- First: selects the first positive occurrence of an extraction in a particular document.
- Last: selects the last positive occurrence of an extraction in a particular document.
- Most Common: selects the most common candidate as the extraction for a particular document.
Miscellaneous
- ColumnDropper: drops one or more columns from your DataFrame.
- ColumnRenamer: renames one or more columns in your DataFrame, e.g.,
{"old_column_name": "new_column_name"}.
Post processors in extraction blocks
Filters, normalizers, and reducers are examples of post processors that operate over model predictions. After applying post processors in extraction blocks, you’ll be able to see document or entity level metrics. See the Information extraction: Extracting execution dates from contracts tutorial for a end-to-end example of this.
Embedded data table viewer
Enhance data exploration of your tabular data by utilizing the Embedded table data viewer. This functionality will visualize any columns that have nested information.
Embedded table view is a beta feature that is opt-in for customers. Please reach out to your Snorkel account representative if you are interested in getting access.
Data format prerequisite
To be compatible with the TableConverter operator, the format for each row in the column to be converted should be a list of elements or dictionaries. All dictionaries also need to have the same keys (in terms of key name and number of keys).
If converting from a pandas DataFrame you can use the sample code below. This will create the list of elements for one row in your dataset:
filtered_df_per_row.to_dict(orient='records')
Example of a properly formatted list to be converted:
[{"name":"Christie","email":"christi@gmail.com","role":"sender", "source_ip":"127.0.0.1"},
{"name":"Jennifer","email":"Jennifer@gmail.com","role":"receiver-main","source_ip":""},
{"name":"bob","email":"bob@gmail.com","role":"receiver-cc","source_ip":""}]
Adding a data table viewer
The TableConverter Operator allows you to represent lists of elements in a table view in the label section of the Snorkel Studio.
How to produce the table view with a TableConverter operator:
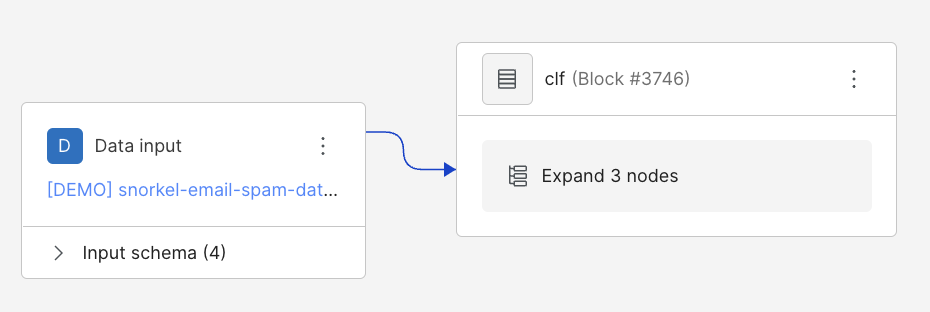
1. Go to the Application Studio and expand nodes.
Ensure you are on edit mode in the application studio and not read mode before trying to add or delete nodes. To switch modes, use the mode selector in the top right corner of the application studio workspace.
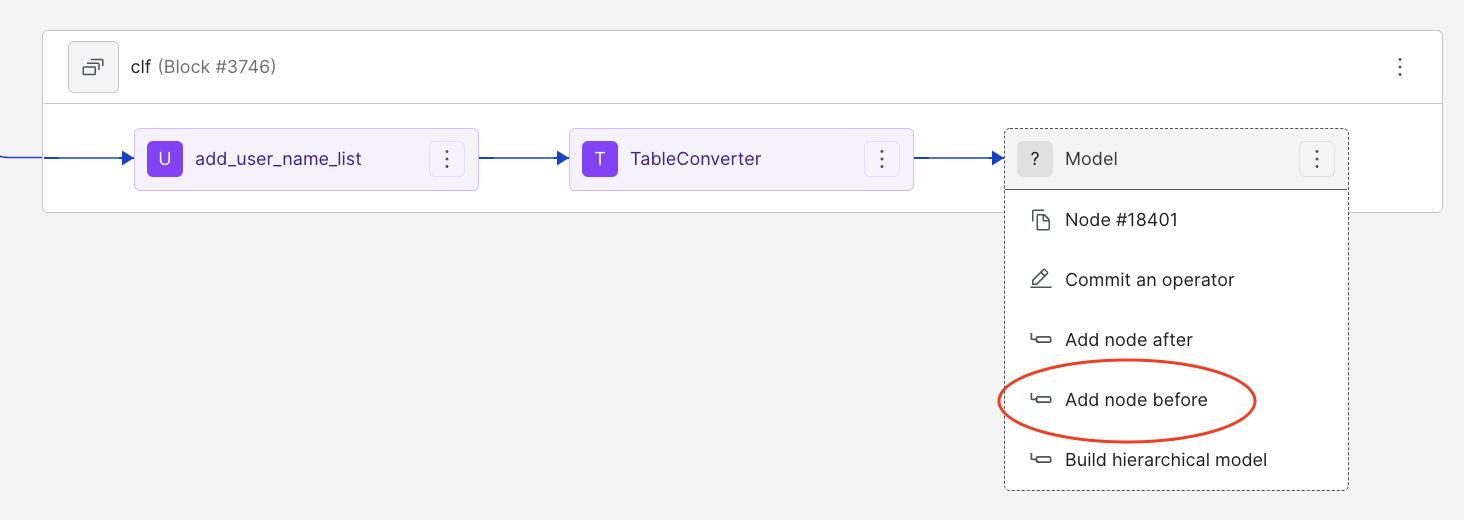
2. If you don’t already have a blank node, select the three vertical dots on the node labeled “Model”, and then select “Add node before.”
Use ChangeColumns when prompted.
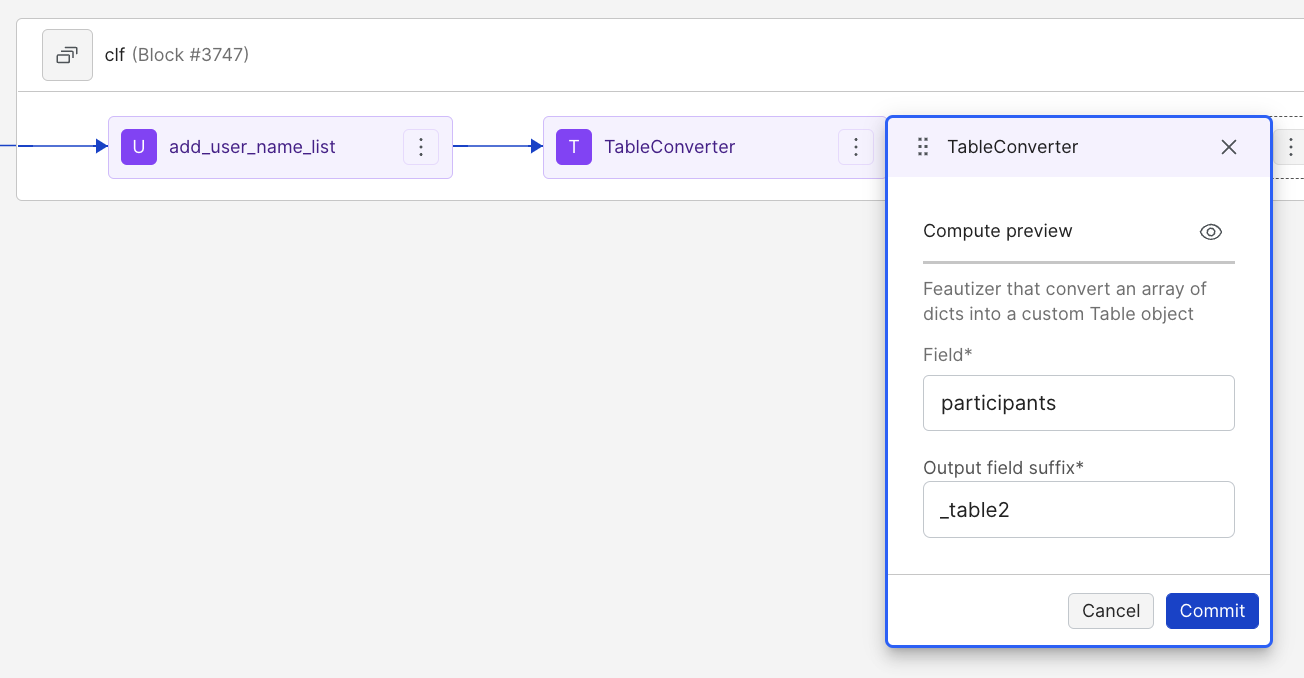
3. Select the three dot menu on the new node labeled ChangeColumns and select commit an operator. Type “TableConverter” in the menu search bar and select the option.
4. Fill out the fields of the TableConverter with strings relevant to the data. Here we’re using the HAM versus SPAM example email data, so the field used here is participants. The output suffix field can be anything, it’s only going to be used to produce the name of the new table.
5. After clicking commit, navigate back to the Studio. On the right side, scroll down to the bottom of the page where you should see a table generated. The name of the table is the field and output field suffix filled out in the last step.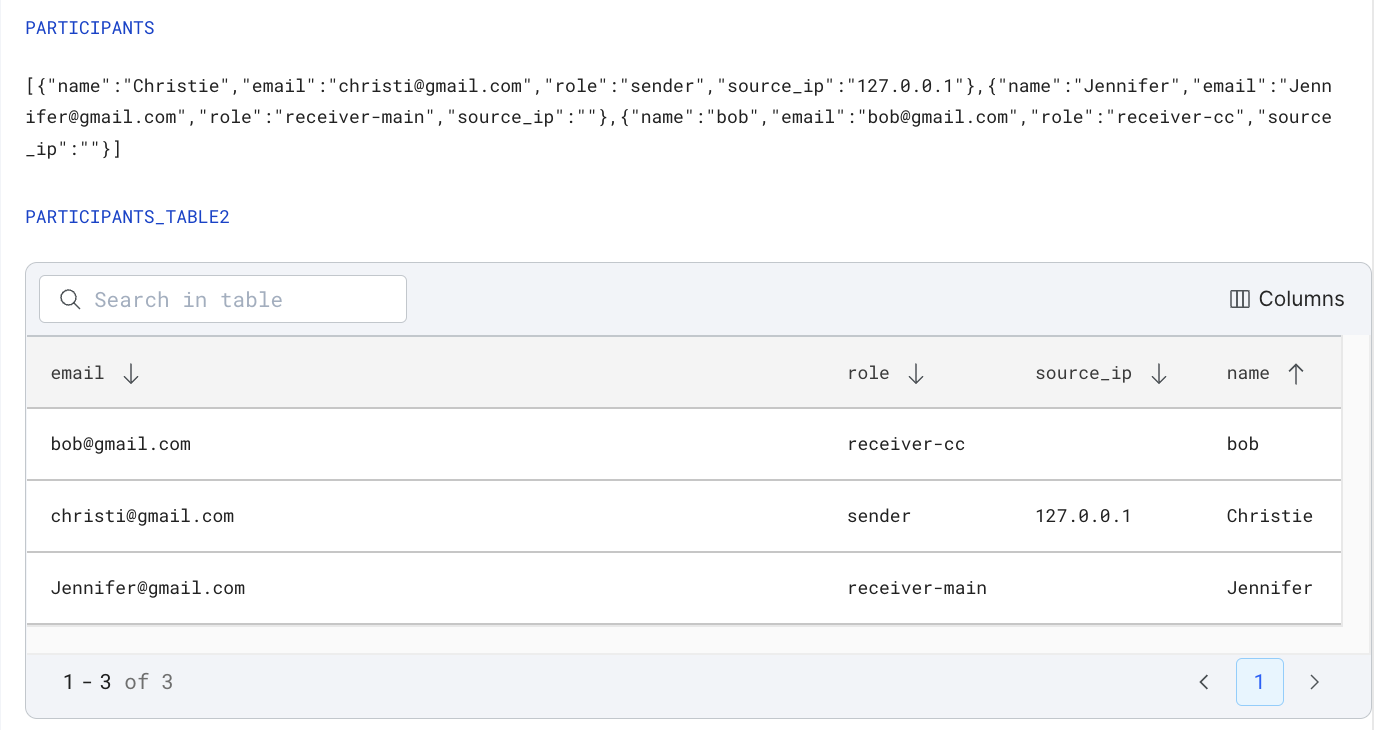 Using the data table viewer
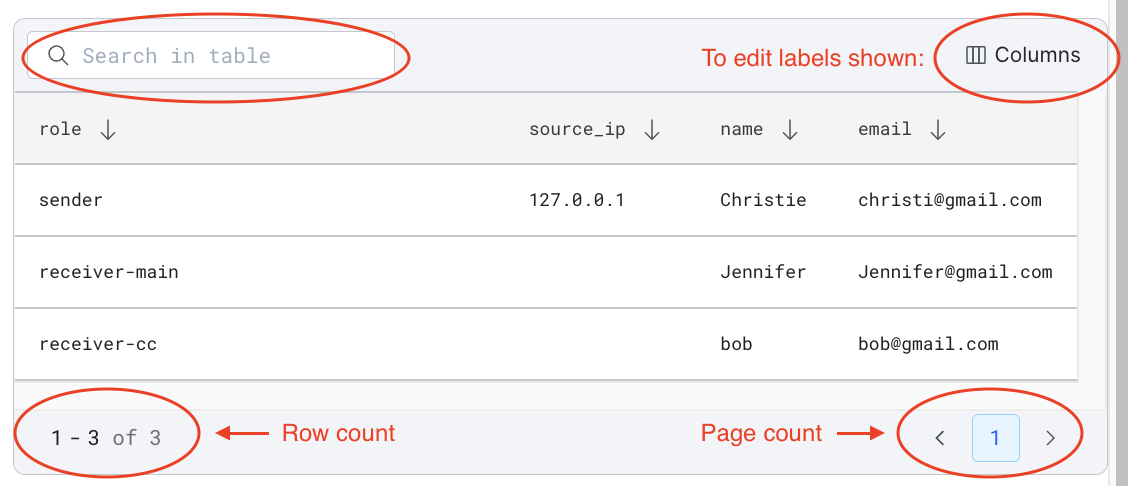
Editing columns: to change the columns displayed by the table, click on the column button in the top right corner of the table and select (or de-select) the desired columns. The table should change its displayed elements as you do this.
Pages: you can flip through the pages of data displayed if there is enough data that more than one page is needed by going to the bottom right corner of the table and using the arrow buttons to navigate through.
Search Bar: feel free to search through the tabular view using the search bar in the top left corner using the value of any label present.
Row count: the number of data rows present is displayed in the bottom right corner of the table.
Arrows: the arrows next to each label allow you to organize the table using that label. If you set all the arrows upward (change arrow orientation by clicking on the arrow once), and then change one label to downward, the table will be organized based on that label. You can organize your data alphabetically, numerically, or by value depending on the label selected.
See all the above features highlighted in the screenshot below:
User-defined operators
The Snorkel Flow Python SDK provides utilities to help you define operators using Python code that can then be registered with Snorkel Flow and used to process your datasets through the web UI.
Selecting the operator in the GUI
After registering a custom operator to a dataset, it will be available in the web UI. You can commit custom operators by clicking on a node in the application graph and searching by name.