Manage batches and commit ground truth
This page walks through how to manage your batches and then commit annotations to ground truth to be used for development in Studio. For information about how to create batches, see Create batches.
How to manage your batches
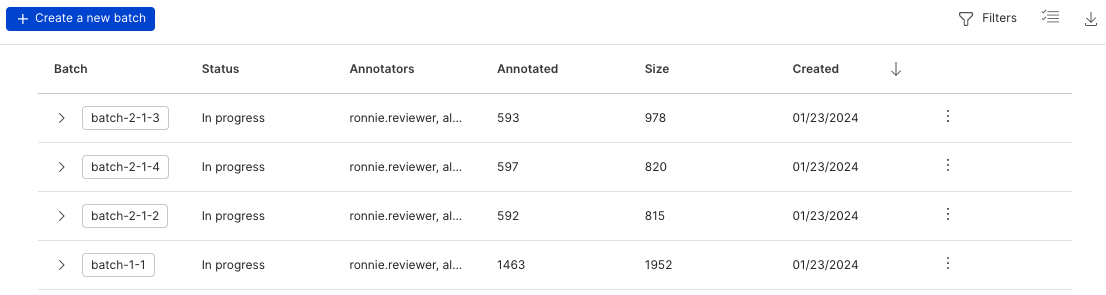
Once you have created batches, you can manage them in Annotation Studio from the Batches page. Click Batches in the left-side menu to get to the Batches page.
On the top bar, the following actions are available:
- Click the + Create a new batch button to create a new batch of data points for annotation.
- Click the Filters button to filter the batches by annotator or by status.
- Click the Toggle bulk options
 icon to show the option to bulk delete batches.
 - Click the Export dataset across all batches
 icon to export all batches to a CSV file.
For individual batches, the following information is available. You can select any of the columns to change the sort order of the table:
- Batch: The name of the batch. Click the button to access the batch.
- Status: Specifies whether annotations on the batch have not be started, are in progress, or have been completed.
- Annotators: The list of annotators that have been assigned to annotate the batch.
- Annotated: The number of data points in the batch that have been annotated.
- Size: The total number of data points that are in the batch.
- Created: The date that the batch was created.
- Overflow menu: Click
 to either rename or delete the batch.
Export data
It may be helpful to export the current dataset and annotations for further analysis or reporting outside of Snorkel Flow. You have the option export data across all batches or at the batch level on the Batches page.
To export a dataset that includes all batches, click the Export dataset across all batches icon in the top right corner of your screen. Fill out the following options in the Export annotation batches modal:
- Include columns: Specify which columns to include in the export. This option enables you to select a more focused slice of your data, or you can speed up export time by dropping large columns in a dataset.
- Include options: Specify additional information about individual data points to include such as annotations, comments, tags, filters applied, and model predictions.
- Optional settings: Specify additional options to customize your export. These options include the ability to start an export at a specific index in the dataset, setting a maximum number of data points to export, and options to configure delimiters, quote chars, and escape chars.
To export a dataset for an individual batch, first click into the desired batch. Click the gear icon  at the top right corner of your screen, then click Export Studio dataset. The Export Studio dataset modal provides the same options as when exporting a dataset across all batches. In addition, you have the option to include predictions from a specified model.
Manage individual batches
Click the arrow  next to the batch name to view additional information about an individual batch. The following sections walk through the additional actions that you can take on an individual batch.
Assign/update annotators to batches
If no annotators are assigned to a batch, click the + Add Annotator button. In the Assign modal, you can select one or multiple annotators from the drop-down list to assign to the batch. Once you have made your selections, click Update annotators.
If you want to add or remove annotators that are assigned to a batch, click the Update annotators button. The same Assign modal will pop-up and you can select or unassign annotators. Click Update annotators to save your changes.
Set annotators as experts
To mark an individual annotator as an expert for the batch, select the annotator, and then click Set as expert. A badge icon will show up next to the annotator's name to indicate the expert status. Click Remove expert status to remove this designation.
Marking an annotator as an expert causes the Agreement column to populate for every annotator on that batch with an agreement rate relative to the expert.
To view the agreement rate across all batches and annotators, see the Inter-annotator agreement chart on the Overview page.
Aggregate annotations
Typically you'll have more than one annotator reviewing and labeling documents. You can only commit a single vote to ground truth, so you may want to aggregate annotations versus committing the annotations from a single person. This can help eliminate potential bias from any particular annotator. To aggregate annotations, select the annotators that you want to aggregate, then click Aggregate.
The only currently supported aggregation strategy is the majority vote. This takes the majority label for each data point if one exists, and leaves an UNKNOWN label where no annotations exist. The result of this aggregation is a new set of annotations with a single vote for each data point. The aggregated annotations can be seen in the expanded view of batch on the Batches page, under Other annotations.
The following sections walk through how the majority vote aggregation algorithm works for each task type.
Single-label
We use a simple majority algorithm as our aggregation strategy for single-label applications. In other words, we count the number of votes for each label, and then choose the label with the most votes as the final decision. However, in the case of a tie between two or more majority labels, we use a pre-determined random seed to perform a random choice selection.
For example, let's say we have a single-label application with ten annotators and two classes. Six annotators label a data point with class A, and four annotators label a data point with class B. Because class A now represents the majority vote, at aggregation time, the aggregated result will label this data point as class A.
Multi-label
We use a simple union algorithm as our aggregation strategy for multi-label applications. In other words, we count the number of present/absent votes for each class, and then choose the label (present or absent) with the most votes for each class as the final decision. However, in the case of a tie where there is an equal number of present and absent labels, the resulting label has an equal chance of being marked as present or unknown.
For example, let's say we have a multi-label application with ten annotators and two classes. For class A, six annotators vote present and four annotators vote absent. For class B, four annotators vote present and six annotators vote absent. By taking the majority vote of each class, the aggregated label for the data point will vote present for class A and absent for class B.
Sequence tagging
We use a simple majority algorithm as our aggregation strategy for each span in sequence tagging applications. In other words, we count the number of votes for each label in any interval where annotators disagree, and then choose the label with the most votes as the final decision. However, in the case of a tie between two or more majority labels, we default to the label with a negative class in order to reduce the risk of false positives, such as trailing spaces or mistaken tokens. If the tie is between only positive labels, we use a pre-determined random seed to perform a random choice selection.
Commit annotations
Once you have a set of annotations that you are happy with, you can commit them to ground truth to be used for development in Studio. To do this, select the desired annotation set, then click Commit. You can select annotations from either an individual annotator or from an aggregated set of annotations.
Only users with the Developer (or Administrator) role have the ability to commit ground truth.
Once you commit annotations, all existing ground truth labels in the data source are overwritten.